There’s nothing quite like the aroma of freshly baked sourdough sandwich bread filling the kitchen—the golden crust, the soft, airy texture, and that perfect balance of mild tang and sweetness. It’s the kind of bread that transforms a simple sandwich into something special.
This homemade sourdough sandwich bread recipe is my go-to for soft, fluffy loaves that are perfect for everything—from classic deli sandwiches to crispy toast slathered with butter. Once you try it, you’ll never want store-bought again!
Main Highlights
- Soft, light, and airy sourdough sandwich bread with a slightly tangy flavor.
- It is made with simple, wholesome ingredients like all-purpose flour, sourdough starter, olive oil, and honey.
- Furthermore, it is versatile for sandwiches, toast, and more.
- Additionally, it requires a 10-12 hour fermentation time for optimal texture and flavor.
- Finally, it bakes up with a thin, crispy crust and a tight, even crumb.
Table of contents
- Why This Sourdough Sandwich Bread Will Become Your Family Favorite
- Key Ingredients for the Best Sourdough Sandwich Bread Recipe
- Understanding Your Sourdough Starter
- How to Make Sourdough Sandwich Bread (Step-by-Step Guide)
- Mastering the Bulk Fermentation Process
- Shaping Techniques for Sandwich Loaves
- Baking Tips for Soft and Fluffy Results
- Storage and Preservation Methods
- FAQ
- Conclusion
Why This Sourdough Sandwich Bread Will Become Your Family Favorite
Homemade sourdough bread is a big win for your family. Not only is it good for you, but it also tastes amazing. Moreover, it’s perfect for everyday meals.
Health Benefits of Homemade Sourdough
This bread is made with simple, quality ingredients, which makes it better than store-bought. Additionally, the way it’s made makes it easier to digest for some people. If you’re interested in maximizing the benefits of your sourdough journey, explore ways to use leftover starter with these sourdough discard recipes.
Moreover, the slow-rise method keeps nutrients in while also making the bread full of antioxidants.
Texture and Flavor Profile
Try one bite and you’ll love it because it’s light and airy, with a thin crust. Furthermore, the tangy flavor enhances any meal, making it truly unforgettable.
Versatility in Daily Use
This bread is great for many meals. For instance, you can use it for thick sandwiches or thin slices. Additionally, it’s perfect for toast, bruschetta, or as a delicious snack. For a creative breakfast idea, try using this bread to make a delicious sourdough French toast.
“Once you try homemade sourdough, it’s hard to go back to store-bought. The flavor and texture are simply unbeatable.”
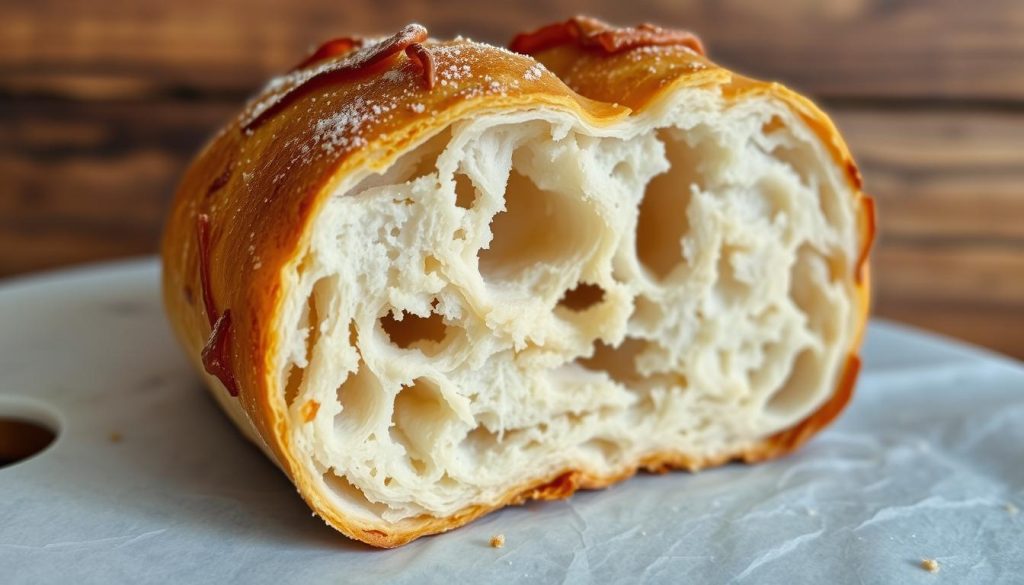
A close-up of freshly baked sourdough sandwich bread, showcasing its soft, airy texture with a golden, crusty exterior, intricate open crumbs, and glossy surface, set against a rustic wooden background.
| Nutritional Information (per serving) | Amount |
|---|---|
| Calories | 153 |
| Sugar | 1.2g |
| Sodium | 194.9mg |
| Fat | 3.3g |
| Carbohydrates | 26.9g |
| Fiber | 0.9g |
| Protein | 3.5g |
| Cholesterol | 7.8mg |
Key Ingredients for the Best Sourdough Sandwich Bread Recipe
To make the perfect sourdough sandwich bread, you need the right ingredients. You’ll need unbleached all-purpose flour, active sourdough starter, warm water, and a bit of honey or olive oil.
Here’s what you’ll need for the best taste and texture:
- Unbleached all-purpose flour (preferably King Arthur Flour) – 415g
- Warm water (around 80°F) – 240g
- Active sourdough starter – 110g
- Honey (or maple syrup for a vegan option) – 20g
- Light olive oil – 20g
- Kosher salt – 10g
Choosing high-quality ingredients is key for a great loaf. The flour gives the right texture and taste. The sourdough starter adds a tangy flavor and aroma. Honey or maple syrup adds sweetness, and olive oil makes the bread soft.
| Ingredient | Amount |
|---|---|
| Unbleached all-purpose flour | 415g |
| Warm water | 240g |
| Active sourdough starter | 110g |
| Honey (or maple syrup) | 20g |
| Light olive oil | 20g |
| Kosher salt | 10g |
With these ingredients, you’re ready to bake a delicious sourdough sandwich bread. It will be a favorite in your home.
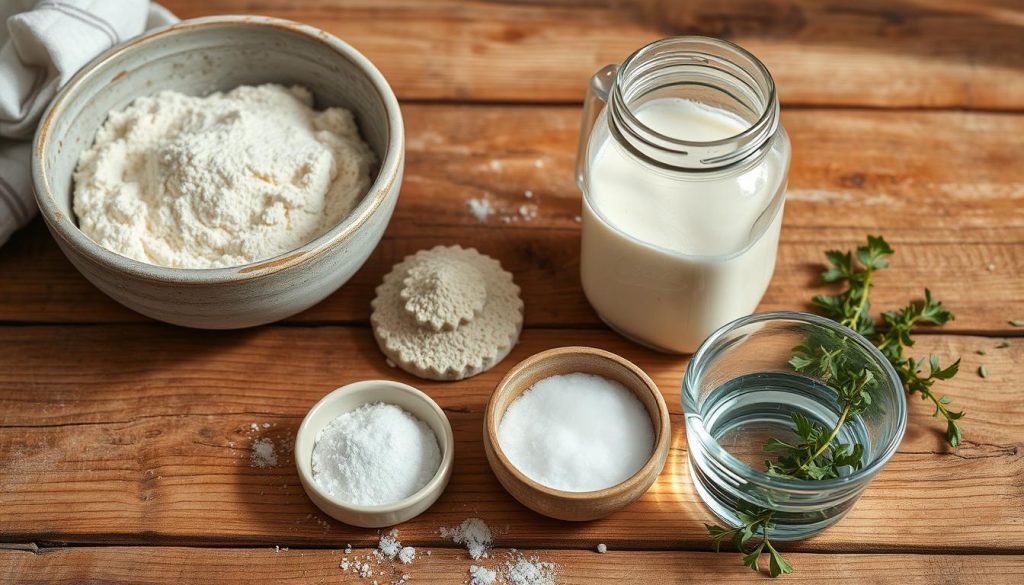
A rustic wooden table filled with essential sourdough bread ingredients: a bowl of flour, a jar of active sourdough starter, a small dish of sea salt, a measuring cup of water, and a sprig of fresh herbs. Soft natural light illuminating the scene, emphasizing textures and colors.
Understanding Your Sourdough Starter
At the heart of this soft sourdough sandwich bread recipe lies a thriving, active sourdough starter. Keeping your sourdough starter healthy is key for the perfect loaf. It gives the bread its tangy flavor and chewy texture. Let’s explore the basics of caring for your sourdough starter.
Feeding Schedule and Ratios
To keep your sourdough starter ready for baking, follow a consistent feeding schedule. For this recipe, feed your starter 12 hours before mixing the dough. Use a 1:4:4 ratio of starter, flour, and water.
This slow overnight rise in a 68-70°F kitchen will ensure your starter is active. If you need a quicker rise, use a 1:1:1 ratio instead.
Signs of Active Starter
- A healthy, active sourdough starter should double in size after feeding and show plenty of bubbles on the surface.
- The starter should have a pleasant, slightly yeasty aroma, free from any unpleasant odors.
- When you scoop out a spoonful of the starter, it should be smooth and lively, not thick and sluggish.
Temperature Considerations
The temperature of your kitchen is important for sourdough starter maintenance. Warmer temperatures, around 75-85°F, may require more frequent feedings. This keeps the starter active and bubbly.
Cooler temperatures, below 68°F, can slow down the starter’s activity. You’ll need fewer feedings. Watch your starter’s behavior and adjust the feeding schedule as needed. This ensures it’s at its best when it’s time to mix the dough.
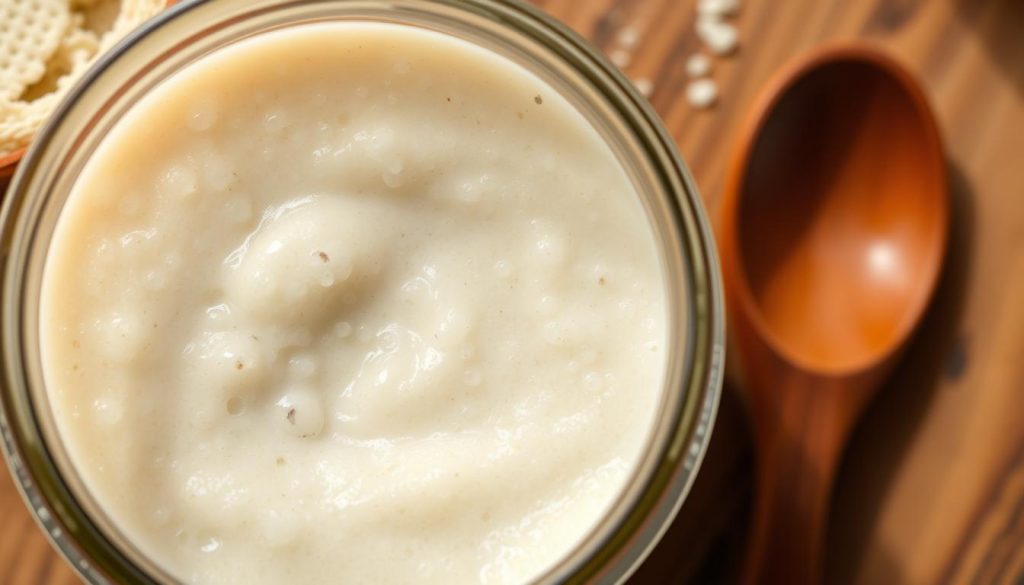
A close-up view of a bubbling sourdough starter in a glass jar, with a wooden spoon resting beside it. The mixture appears creamy and textured, with small bubbles forming on the surface, showcasing its fermentation process. Soft natural light illuminates the scene, highlighting the warm tones of the starter and the rustic wooden background.
“A happy, well-fed sourdough starter is the foundation for a successful loaf of sourdough bread.”
How to Make Sourdough Sandwich Bread (Step-by-Step Guide)
Making the perfect sourdough sandwich bread is an art. It leads to delicious results. This recipe shows you how to mix and proof the dough. You’ll get a soft, fluffy loaf that everyone will love.
- In a big bowl, mix 500 grams of bread flour, 100 grams of sourdough starter, 260 grams of water, 10 grams of salt, and 20 grams of sugar. Start with a shaggy dough.
- Knead the dough for 10 minutes. Use a stand mixer or knead by hand on a floured surface.
- Let the dough rest for 30 minutes. Then, do stretch and fold exercises every 30 minutes for 3 hours.
- When the dough is 25% bigger and feels light, split it into two parts. Shape them into rectangular loaves.
- Put the loaves in greased 9×5-inch pans. Let them proof for 1-2 hours until they rise a bit.
- Heat your oven to 400°F (200°C). Put a shallow dish of water on the bottom rack for steam.
- Bake the loaves for 10 minutes. Then, lower the oven to 375°F (190°C) and bake for 20-25 minutes more. They should reach 210°F (100°C) inside.
- Take the bread out of the oven. Let it cool on a wire rack before slicing and serving.
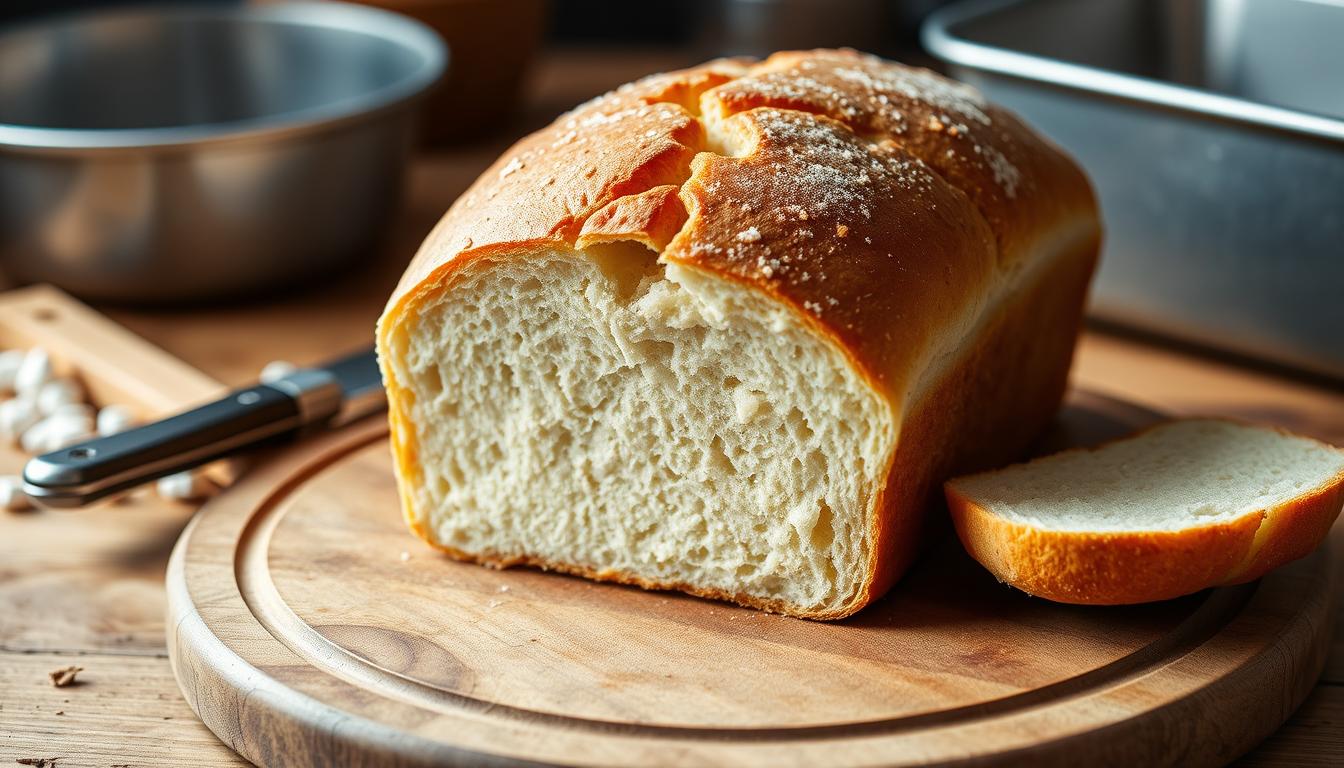
This sourdough sandwich bread recipe makes two fluffy, golden loaves. They have a great texture and taste. Homemade sourdough is healthier and better for your blood sugar.
“The perfect sourdough sandwich bread is a labor of love, but the results are truly worth the effort.”
Mastering the Bulk Fermentation Process
The bulk fermentation stage is key to making perfect sourdough sandwich bread. It lets the dough get its special flavor and soft, airy texture. Knowing when and how to check for these signs is crucial for great homemade sourdough loaves.
Time and Temperature Guidelines
The bulk fermentation phase usually lasts 10-12 hours. It happens best at 68-72°F (20-22°C). The dough should double in size as yeast and bacteria work.
Colder kitchens need longer time. Warmer ones make it faster.
Visual Cues for Perfect Fermentation
Watching the dough’s look helps know when it’s done. A good dough looks relaxed and puffy, with bubbles on the surface. If it’s too sticky, it’s over-proofed and needs reshaping.
Change the time based on your kitchen’s temperature and humidity. Watch the dough closely. Use visual signs to get the perfect rise for soft, fluffy sourdough.
Shaping Techniques for Sandwich Loaves
Making the perfect sourdough sandwich bread starts with shaping. The right way to handle the dough is key. This ensures a well-structured loaf with an even crumb.
Start by gently patting the dough into a 9×12 inch rectangle. This gets it ready for a classic sandwich bread shape. Then, roll it up tightly, sealing the seam and ends well.
Building tension on the dough’s outside is crucial. Use your hands to gently pull it towards you. This builds the loaf’s structure and strength. It also helps it rise evenly and get a beautiful crumb.
Finally, put the dough seam-side down in a loaf pan. The pan helps it rise and bake into a perfect sandwich bread shape. With practice, you’ll make sourdough sandwich loaves like a pro. Enjoy their soft, fluffy goodness in your favorite sourdough bread recipes.
“Mastering the art of shaping sourdough sandwich loaves is the key to achieving the perfect texture and rise every time.”
Focus on building tension and use a loaf pan for support. This ensures your sourdough sandwich bread rises evenly. It bakes into a soft, fluffy loaf perfect for daily sourdough bread shaping needs.
Baking Tips for Soft and Fluffy Results
To get the perfect sourdough sandwich bread, pay close attention to baking techniques. Control the temperature and create steam. These steps will give you a soft, fluffy crumb and a golden crust.
Temperature Control Methods
First, preheat your oven to 450°F. Then, lower it to 375°F when you put the loaf in. This high heat at first makes the bread light and airy.
Keeping the right baking temperature is key. It helps your sourdough crust and crumb develop well.
Steam Generation Techniques
- Put a few ice cubes at the bottom of your oven before adding the bread. As they melt, they create steam. This makes the crust shiny and soft.
- Or, use a spray bottle to mist the oven with water when you add the bread. This also helps with steam for a great crust.
Achieving the Perfect Crust
Bake the bread for 35-45 minutes until it’s golden brown. For a softer crust, brush it with melted butter right after baking. This makes the crust soft and perfect for sandwiches.
By using these baking tips, you’ll make soft, fluffy sourdough bread every time. The right temperature and steam are the secrets to success.
Storage and Preservation Methods
Storing your sourdough sandwich bread right is crucial for keeping it fresh. Sourdough bread lasts longer than regular bread because of its natural acidity. This comes from the fermentation process.
To keep your sourdough bread fresh, store it at room temperature. Use an airtight container or bread bag for up to 3 days. This stops the bread from drying out too fast. Don’t put it in the fridge, as cold air can make it dry and hard.
If you want to keep it longer, slice the bread and freeze the slices. Frozen sourdough bread slices can be toasted straight from the freezer. Frozen slices can also be quickly transformed into comforting dishes like grilled cheese and tomato soup. This way, your bread stays fresh and tasty for up to 2-3 months.
| Storage Method | Shelf Life |
|---|---|
| Room Temperature (Airtight Container) | Up to 3 days |
| Freezer (Sliced) | Up to 2-3 months |
By using these easy storage tips, you can enjoy your homemade sourdough bread for a long time. The right storage can make your sourdough loaf last longer. This means you can enjoy your baking for days or even weeks.
FAQ
This recipe creates a light, fluffy sourdough sandwich bread with a thin, crisp crust and a mild tangy flavor—perfect for everyday meals!
Store in an airtight container at room temperature for up to 3 days. Freeze slices for up to 3 months for longer freshness.
For a softer crust, brush the loaf with melted butter after baking and store it in a bread box or wrapped in a kitchen towel.
Conclusion
Making your own homemade sourdough bread benefits you in many ways. You get to choose what goes into it. Plus, you enjoy a taste and texture that’s hard to find elsewhere.
The sourdough sandwich bread recipe we shared is perfect for any meal. It’s tasty and versatile, making it a great choice for your daily bread.
Creating artisan bread at home takes time and patience. But the results are worth it. With practice, you’ll learn how to make loaves that everyone loves.
Start baking and enjoy the happiness of making your family a fresh sourdough sandwich bread. You’ll feel proud of your baking skills. It’s a journey that’s both rewarding and delicious.
Now it’s your turn! Have you tried this Sourdough Sandwich Bread Recipe?
💬 Drop a comment below and let us know:
✔️ What’s your favorite way to enjoy sourdough—grilled cheese, toast, or sandwiches?
✔️ Have you experimented with different flours or add-ins like seeds or herbs?
✔️ Do you prefer a soft crust or a slightly crispier bite?
🔥 Pro Tip: If you love a softer crust, try brushing the top with melted butter after baking!
Sourdough Sandwich Bread
Equipment
- Mixing bowl
- Bench scraper
- Loaf pan (notes: 9×5-inch)
- Oven
Ingredients
- 1 cup Active sourdough starter notes: bubbly and fed
- 3 1/2 cups Bread flour
- 1 1/4 cups Warm water
- 2 tbsp Olive oil or melted butter
- 1 tbsp Honey or sugar
- 1 1/2 tsp Salt
Instructions
- In a mixing bowl, combine sourdough starter, warm water, honey, and olive oil. Stir to mix.
- Add bread flour and salt, mixing until a shaggy dough forms.
- Knead the dough for about 8-10 minutes until smooth and elastic.
- Place the dough in a greased bowl, cover, and let it rise at room temperature for 8-12 hours (overnight) until doubled in size.
- Turn the dough onto a floured surface and shape it into a loaf.
- Place the dough into a greased 9×5-inch loaf pan, cover, and let it rise for another 1-2 hours until puffy.
- Preheat the oven to 375°F and bake for 30-35 minutes until golden brown.
- Let cool in the pan for 10 minutes, then transfer to a wire rack to cool completely before slicing.
This sourdough sandwich bread looks absolutely perfect, Olivia! Love that it’s soft and fluffy but still has that delicious sourdough tang. Can’t wait to bake a loaf this weekend!